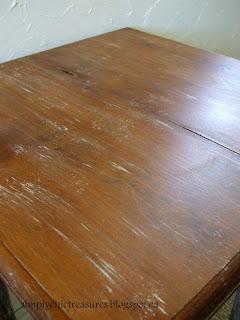
This is a really old table that I purchased at auction late last summer. I left it alone because I was never really sure what to do with it. The top that came on it was a thin sheet of plywood covered in old contact paper and was an obvious replacement that needed replacing once again. And so it sat... and sat some more, waiting for inspiration.
Here is a not-so-great before picture to give you an idea.
But a week, or so ago, I knew I had to get at it! So, what I did was take apart an old 'country' style pine folding tv table. The top was a perfect fit! I had purchased it earlier at a yard sale for only a dollar, so I didn't mind sacrificing it!
I dry brushed on a coat of white and then dry brushed some blue over top. After it was dry, I gave it a good sanding and a coat of wax. I love how smooth the finish feels when you're all done! I also like how quickly the paint dries, too!
And then, because I didn't like how pristine the new top looked compared to the rest, I very, very, veeerrrry, carefully applied a smattering of white paint over the top. And then added a couple dings... that was fun!
I have found that the more you sand a piece, the more the milk paint sticks. So, I only lightly sanded this, and it turned out perfect... (in my opinion, anyways!)
The legs are wonderful on this table. I am pretty sure they are hand turned. I wouldn't have painted it, except I didn't want the replacement top to be so obviously different than the base.
I have decided that I really like using milk paint! The brand I have is Old Fashioned Milk Paint and I purchased it from Lee Valley in London, ON. The colours I used for this table were Slate and Snow White.
And the lamp? It was a rusty old auction piece, too, that I revived with some rub 'n buff and my husband rewired for me. I still haven't found the perfect place for it, though... it keeps moving around. I do like it, though!
I have been a busy bee painting furniture lately, and I have a couple more pieces to share with you soon!
Linking to :
My Repurposed Life: Catch as Catch Can
Miss Mustard Seed: Furniture Feature Friday
The Shabby Nest: Frugal Friday
Finding Fabulous: Frugaliscious Friday
Chic on a Shoestring: Flaunt it Friday
Shabby Art Boutique: Shabbilicious Friday
Homespun Happenings: Rustic Restorations
Classy Clutter: Spotlight Saturday
Funky Junk: Saturday Night Special
Tatertots & Jello: Weekend Wrap-Up Party
My 1929 Charmer: Sunday's Best
Coastal Charm: Nifty Thrifty Tuesday
Primitive & Proper: POWW


Hi Cynthia,
ReplyDeleteI was wondering if you can help me out???
I painted a few pieces of furniture with varnish on them didn't sand or prime do you have any tricks to make the paint stick???
Please tell me you do, I just can't start from scratch again...
Not ever going to do that again...
Can you hep...
Blessings Lori
You did a fantastic job of making the top look original to the bottom! It's a very pretty table, now that you gave it new style! ~ Maureen
ReplyDeleteThat looks really great. I have not yet tried milk paint. TFS!
ReplyDeleteI love the finished piece! Can you get that brand of milk paint in the US?
ReplyDeleteI just love how this turned out. You would never know that the top was a replacement. Great work!
ReplyDeleteThis looks amazing.I love working with milk paint.I really need to use it more.I love how authentic the aged finish looks.
ReplyDeleteAnne
Great job! It looks fantastic!
ReplyDeleteWhat an awesome makeover. A great improvement! And that ottoman below...WOW!!! Kudos to you. It turned out glorious! I'm so glad you added the stripes at the end. : )
ReplyDeleteM.L.
What a beautiful table. It is the perfect finish!
ReplyDeleteThat table looks great. Found you over at MRL!
ReplyDeleteVery nice!
ReplyDeleteBeautiful job, Cynthia! I adore the patina you added to it! And don't you just love Rub-n-Buff? It's the greatest thing ever! :)
ReplyDeletexoxo laurie
I love it! I can't believe that is not the original top--It matches perfectly with that milk paint. I never used milk paint before. Thanks so much for linking it up to Rustics Restoration Weekend! Have a great Weekend!!
ReplyDeleteSo pretty!! I've never used milk paint before either... I may need to try it one of these days!
ReplyDeleteI really do love a milk paint finish. The table top is perfect and the paint is beautiful.
ReplyDeleteJanet
Great transformation!
ReplyDeleteBeautiful color and perfectly distressed!
ReplyDeleteYou did a great job! The table top is perfect and love the lamp!!
ReplyDeleteLove it!
ReplyDeleteBeautiful job!!! Megan
ReplyDeletegorgeous! the color you chose for the base is stunning!
ReplyDeletereally cute table, I love the color, and the touch of white on the top was perfect!
ReplyDeletegail
Love what you did...being new to your blog, I have a question,
ReplyDeletewhat exactly do you mean by "dry brush"?
Dry brushing is when you only have a little paint on your brush and you lightly wipe it over the surface. When I dry brushed the top of this table I only had the teensiest bit of paint on my brush, and when I needed to redip it, I would brush the excess paint off on a scrap.
Delete